How to clean a rusty fuel tank

Items that may need to be purchased
  • White distilled vinegar (I bought it in two gallon cases at the local Sam’s Club for $4/case, and I needed 7.5 gallons).
  • Dawn soap
  • Something to plug the bottom of the tank (I bought a new sediment bowl setup from TM, as the one I had was starting to corrode badly, as I result I just left the old sediment bowl in place for the rest of this)
  • Some way to drain the tank back into the vinegar bottles once the job is done (I put a fitting on the old sediment bowl and used a rubber fuel line for this).
  • 50 nuts or larger washers.
  • Baking Soda
  • 8 Gallons of non-ethanol gasoline
  • Marvel’s Mystery Oil (MMO)
Process
  1. Drain and discard any fuel in the tank
  2. Remove the tank from the tractor
  3. Wash the tank with some dawn and water to break apart any petroleum products left in the tank (they create a barrier for the acid to get to the rust, and make the process take longer). Get the soap out, but don’t worry about a few ounces of water left in the tank at this point.
  4. Ensure the bottom is plugged, however you intend to do that.
  5. Add vinegar until full to the very top. As the vinegar evaporates and/or has a chemical reaction it releases gas into the air that will cause any exposed metal at the top, including the gas cap, to rust very badly in no time. Use the baking soda to neutralize any vinegar that was spilled on the paint.
  6. Each day, top off the vinegar in the tank (I found that I am bad at hitting the tank, so I kept the baking soda handy for this).
  7. After 7 or 8 days, drain the vinegar back out into the vinegar bottles.
  8. Add the cleanest bottle of vinegar back into the tank and throw in the nuts and washers, shake it around for 30-45 seconds (make sure you shake them all around the tank, these will knock any slightly loose rust off).
  9. Dump the tank upside down and empty out all the washers and nuts (and loose rust).
  10. Add some more water for another rinse, swish it around to pick up any leftover rust pieces, washers, or nuts, and then dump it again.
  11. Add and then drain acetone to eliminate any leftover water.
  12. Install the new sediment bowl on the tractor (Only if you are replacing it)
  13. Put the tank back on the tractor.
  14. Add MMO to the tank.
  15. Fill with gasoline.

Bringing home the Cub

I had been looking at Farmall Cub tractors for some time, but I had never been willing to pull the trigger on purchasing one.  Too many other time and financial priorities to spend a thousand dollars on a Cub.

On October 22, 2017, I magically convinced my wife and daughter to visit the Stumptown Tractor Club Tractor & Engine Show in Charlotte, NC.  While there I pointed at a 1956 Cub Lo-Boy and told my wife I wanted one like that, except I didn’t care if it was a Lo-Boy.  The owner of that Lo-Boy said “I have a friend wanting to sell one of those, just a second!”  Before I could even protest, I had a phone to my ear with a gentleman telling me he’d sell me his running Cub for $300.00.  A price I couldn’t refuse.  I hauled it home on October 24th, a 200 mile round trip after work, and that’s where the story begins…

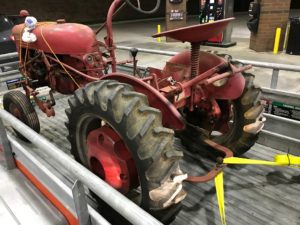
Here is a picture of the Cub strapped into a U-Haul trailer.  I didn’t even know enough to realize the Cub had wheel weights on it, which probably made it exceed the capacity of the trailer (and come very close to the towing capacity of the vehicle I pulled it home with).

That is four separate load straps, each rated at 1500 pounds.

The hood wasn’t bolted down, so I have it bungee strapped.  Luckily, I have the headlights in a box in the back of the tow vehicle.

It didn’t come with a muffler…
But it runs and has hydraulics!